Sunday, December 13

Jewelry Creations


Some different jewelry techniques I've experimented with, all of which definitely need tweaking!


Saturday, December 5

Holiday Cards!


I've designed a couple fun Holiday cards. I'm selling them on Etsy if anyone's interested!


Wednesday, December 2

Lust Group Show


The Beverly Owens gallery, located at 1140 Queen St. W. Toronto, is holding an exciting group show centred around the theme of lust. It's the first in a series of shows inspired by the seven deadly sins. The show runs from Dec.3-Jan.3, and the reception is coming up this Saturday the 5th at 7pm. There are over 100 artists showing work, including me! It should be a sexy and stimulating show. Here is one of the pieces I did for the show:

Monday, November 2

A Peek Under the Pages

I've made a zine entitled "A Tight History of the Corset". It's an historically accurate synopsis of the corset throughout history, complete with a cheeky narrator and Beardsley style illustrations. Here are a few examples.


If you're interested in purchasing a zine, they're $5.00. Just let me know at crystal.art@hotmail.com.


Sunday, October 25

Webstore is Happening!


After much fiddling about with tables and Paypal buttons, I now have prints for sale on my website. Through the site I'm offering higher quality prints than I sell at art fairs. My silk screened shirts will be available soon as well.


If anyone experiences any difficulties with the site, please let me know! My email contact is on the website. Here is the link:


Yes, it's that time again! Canzine! For anyone who hasn't heard of it, Canzine is Canada's largest zine and DIY fair. Last fall I was too busy to go due to OCAD overload, so I'm super pumped to be going this year. I'll be selling my usual wears, (prints, t-shirts), and will also have a couple surprises if all goes according to plan. There will be loads of exciting talent there, so if you can come out, do.

Sunday, September 6

A Farewell Gift


I made this little painting as a parting gift for a good friend. It's inspired by "Where The Wild Things Are". I miss you buddy!

Monday, July 20

Spreadshirt Shop


Just an FYI that I have opened a t-shirt shop on Spreadshirt. It's a site that digitally prints artwork onto shirts. I bought a shirt, (pictured above), before opening the shop to make sure the quality was on the up and up, and I was pleased with the job they did. The result isn't as vivid as a silk screened shirt, but it's perfect for more detailed images.


The major drawback to this website however, is that they have strict "ethical" rules, and have rejected a number of my images due to nudity. I think this is ridiculous... they're just nipples for goodness sake! It's a bummer, because many of my designs will not be available because of this censorship.


Nevertheless, it's a pretty cool service, and you can check it out here. Maybe you can open your own shop!

Friday, July 10

Unintended Self Potrait?


This is a piece I did recently, and I think it might kind of look like me. Strange how that happens sometimes!

Thursday, June 18

My Little Radium Girl


After being prompted by my teacher to combine 3 sketches into one, this is what I got. It's inspired by radium. Perhaps someday I'll bring it to completion with some wicked day-glo colours.


Tuesday, May 26

Gouache It and Wash It


This is a piece I whipped up using a technique I just learned at school called a gouche wash-off. I named her Lily.

Saturday, April 4

Masochist Tutu Revealed

I mustered up the onus to photograph my undercover costume. It's missing a few pieces... the ribbons on the boots, the bodysuit and the head piece. But you get the just of it. I put a lot of work into this baby, and I daresay it paid off. My materials were: a thift store skirt, tulle, aluminum mesh, chicken wire, pattern paper, self-leveling gel, red wire, broken mirror, eyelets, black elastic, and transistors.


Thursday, April 2

John Galliano


A friend of mine alerted me to John Galliano, a super cool fashion designer. Yes, he kind of looks like a pervy pirate, but his work is inspiring. We're talking dramatic and awesome here. Unfortunately I couldn't find many good photos online, (I think he keeps them pretty locked down). But no matter. To get how cool he is you really need to see his runway shows anyways. So here are a couple links!
Revel in this unusual and delightful runway show from spring 2006 here.
Peruse John's fancy website here.
Enjoy!

Monday, March 30

The Silk Screen Journey

I spent a few months last year learning how to navigate the exciting world of silk screening, so I thought I'd share what I've learned so far. Following this entry is a five part tutorial which describes the photo emulsion method. This method is the most complicated and expensive, but it's also the most versatile. You can also attach a stencil to the screen or paint one on with screen filler, but you are limited to simple shapes with these mehods. I used this method for my first silk screen project ever, which was these cute Chritsmas cards.

You can also make stationery...

Or t-shirts!

So let's do it.

Sunday, March 29

Silk Screen Tutorial Part 1 - Shopping List

I'm afraind you're probably going to have to buy a lot of stuff, and you can't get all of it at the art store either. We'll start with what you can get at the art store...

*Silkscreen(s) - The cheapest one I've ever bought was $28. There are wood frames and metal frames. The wood frames are cheaper, but they warp over time. However, the screen can be replaced on the wood frames.
*Sqeegee - There are cheap plastic sqeegees and more fancy squeegees. Honestly, the cheap plastuc ones work fine.
*Photo emulsion, sensitizer, and emulsion remover - Diazo makes a kit with all three for $25.
*Silk screen ink or extender - The regular ink is about $10 a jar. The extender can be mixed with acrylic paint so that it is safe to use with a silk screen. I've never tried the extender myself.
*Hinge clamps - These will keep the screen in place as you work. They run around $30-35 for a set.
*Screen coater (optional) - One of these guys is also about $30-35, and strictly speaking you don't need one, but I highly recommend investing in one. Trying to spread the emmulsion with a sqeegee is a nightmare.
*Huge piece of acetate (optional) - This will be really handy to register your prints. If you're only doing one colour then it's not that helpful, but if you're doing 2 or more colors, I'd spend the $2. Plus they are reusable if you wash them off.
*Piece of glass or plexi-glass that will fit in your screen - My art supply store cut one for me. It was around $8 I think.

From the photo place:

*250 watt photo flood bulb - Less than $5!

From the hardware store:

*utility lamp - Preferably one that is mobile and one that can safely manage the 250 watts. *Masking tape

Grocery/Department/Thrift store:

*sponges
*paper towels
*spatula
*small bowl
*j-cloths
*spoon
*toothbrush

Squeegees!
Screen Coater.


Emmulsion.

All of these items will make more sense as we go through the process. So let's begin!

Silk Screen Tutorial Part 2 - Do Your Image Right


You will need to choose an image that can be easily reduced to a high-contrast black and white picture. For the at home method, the image should have little to no gradation in colour. This is because using a photo flood bulb is not precise enough for the gradation in colour to register on the screen. There are amazing fancy light machines with wild UV bulbs that CAN pick up extreme detail, (OCAD has one), but unless you have access to a machine like this, keep your image simple. I choose this image, which is an illustration of Clytemnestra:


As you can see, it is two colours, black and red. If I want my final printed image to also be two colours, that means I have to split the image onto two separate screens. Thus, I need to separate the two parts onto separate pieces of paper. So Clytemnestra and the bathtub will be on one screen and the blood will be on the other.

Clytemnestra, sans blood splatters.
Here is the blood. As I'm sure you've noticed, the red has been changed to black.


The next thing you need to do is get these two images printed onto acetate.


Silk Screen Tutorial Part 3 - Getting the Screen Ready


First of all, wash your new screen with a regular cleaner and let it dry. You want to be sure the surface of your screen isn’t dirty.


Now you’re ready to coat the screen with photo emulsion. From now on, try to work in a dimly lit area. You want to keep the emulsion away from light as much as possible. Follow the package instructions for adding the sensitizer to the emulsion. Now, pour some emulsion into the screen coater. Let it sit for 5 minutes or so, to let the bubbles settle.


Take a deep breath, get Zen, and coat both sides of the screen twice. With the screen coater helping you out it’s really not that difficult. Here's a video of me pretending to coat a screen. I didn't record the real thing because I didn't want to expose my screens to any light.

Once it's coated lay the screen flat to dry in a dark place and keep it there until you’re ready to expose it. Make sure the screen itself isn’t in contact with anything. Let it dry for two hours or so. The screen is now "sensitized". This means that when it is exposed to light, the emulsion will harden. The sooner you expose, the better.

Silk Screen Tutorial Part 4 - Let's Expose Stuff!


This is where you’re light bulb and lamp come in. Set up your lamp above a table. You can use a pie tin or tin foil around the light bulb to help the light spread more evenly. Prop your sensitized screen up under the lamp. You want the flat side of the screen facing down, but you want a space between it and the table. Place your acetate image in the middle of the screen. Put the piece of glass or plexi-glass on top of the image. (In my example here, the screen was a bit small for my piece of glass, so I had to just tape the acetate down. But the glass helps make a sharper image).


Arrange the lamp the appropriate distance from the screen, and turn it on. Let it expose for the appropriate amount of time. Speedball has a chart of guidelines regarding exposure times for a 250 watt bulb:

Screen Size . . Lamp Height . . Exposure Time
8" x 10". . . . . . 12 inches . . . . . 10 minutes
10"x14". . . . . . 12 inches . . . . . 10 minutes
12 "x 18" . . . . .15 inches . . . . . 16 minutes
16"x2O" . . . . . 17 inches . . . . . 20 minutes
18"x2O" . . . . . 17 inches . . . . . 20 minutes

When the time is up, take your screen to the nearest hose or sink, and rinse, rinse, rinse. Use cold water. You’ll need a strong blast of water pressure, and it takes a while, but you’ll start to see the emulsion rinsing out, leaving a stencil of your image.


Hold your screen up to the light and be absolutely sure that all the parts of the screen that need to be open, in fact are open. You can use a toothbrush to scrub stubborn areas. If you’ve underexposed the screen, the emulsion will not be hard enough, and you may have chunks of the screen washing out that you don’t want open. On the other hand, if it’s exposed too long, the emulsion will be too hard and you won’t be able to rinse out your image, leaving you with a blocked screen. In the event of either of these cases, (and they’ve both happened to me), you have to wash the emulsion off with emulsion remover, and start again. Which obviously really sucks. If it does happen, don’t wait to clean the screen. Emulsion becomes impossible to remove fairly quickly.

Silk Screen Tutorial Part 5 – Finally! Pulling Prints!

Before you begin, make sure you set up all your equipment. You don't want to be scrambling around in the midst of printing. Also be sure to have an area clear for your wet prints to dry. A drying rack works well.


Attach your hinge clamps to the table or a large piece of wood. Tape one side of the large acetate sheet down to the table.

Check your screen for any holes where ink might leak through, and patch them with masking tape. You can also use screen filler if you want, which you can buy at the art store.


Clamp your screen. Prop up the corner with a roll of masking tape and spoon a line of ink onto the bottom of the screen. With your squeegee, push the ink to the top of the screen. This is called "flooding". You need to flood after each print you pull because it prevents the ink from drying out and gunking up your screen.


Now pull a print! Using your sqeegee, apply firm even pressure as you pull towards yourself. You want to print the image onto the acetate first and use it as a guide for all future prints.


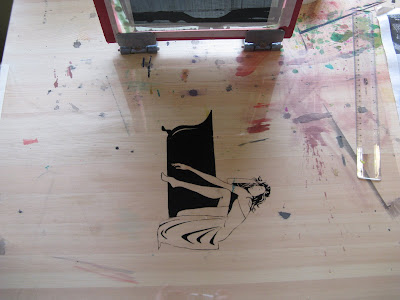
Arrange your paper or shirt under the acetate and line up the image where you want it to be. Then flip up the acetate, lower the screen and pull the print. I usually go over it twice. Definitely do a few practice runs on scrap paper first. Add more ink when you need to. You’ll get a feel for it after some practice. Here's a video of me doing it to give you an idea of speed and pressure and all that stuff.


As soon as you’re done printing, use the spatula to scoop up the excess ink from the screen and put it back in the jar. The get to cleaning the screen! You do not want to let the ink dry in the screen. Warm water is ok, but hot could still damage the emulsion if it’s fresh. Hold the screen up to the light to be absolutely sure the stencil is completely clear.


Don't forget to clean off the acetate so you can reuse it. Just water will do the trick!

Now repeat this process for the other layer(s) of your design.

And here are a few more random footnotes:

  • If you've printed onto fabric, you need to iron the image. If you don't it could fade in the wash.
  • In terms of sufaces to print onto... different surfaces may require different amounts of pressure, or more or less pulls with the sqeegee. For example, if you're using glossy paper, you need less pressure, because too much will cause the ink to bleed. You have to experiment a lot. Generally speaking, I'd say more absorbant surfaces are easier to work on.
  • If you're pulling lots of prints, your screen can dry out after a while. This is where the squirt bottle can help you out. Using a few squirts and a sponge you can gently clear any parts of your screen that are getting blocked by drying paint. Then pull a few prints on scrap paper until the consistency is good again.
  • I usually keep my screens permanently. But if you want to wash it out, do it ASAP. The emmulsion is really difficult to remove and if you wait more than a couple days, it's pretty much impossible. You have to use the special emulsion remover I mentioned in the materials list.
  • If you're using the same screen to do multiple colours, sometimes the squirt bottle trick will be enough to clean the screen and start the next colour. But if you need to rinse the screen in the sink, you can speed up the drying process a lot with the use of a hair dryer.
  • If you need to, you can touch up your prints with a paint brush.